If you’re an outdoor enthusiast, then you know that anything can happen when you’re out in the wild. One moment you’re enjoying the breathtaking scenery, and the next you find yourself in a survival situation. In these scenarios, the ability to create a shelter using the natural resources around you can be the difference between life and death.
Building a survival shelter out of sticks is a valuable skill that every outdoor enthusiast should learn. Not only is it an effective way to stay safe and protected in the wilderness, but it can also be a fun and rewarding experience. Using sticks to build a shelter allows you to connect with the natural world and challenge yourself to think creatively and resourcefully.
In addition to the practical benefits of building a shelter, the process itself can be a great way to unwind and reconnect with nature. There’s something deeply satisfying about using your hands and ingenuity to create a safe and comfortable space for yourself in the wild.
With that in mind, in the rest of this guide, we’ll take you through the steps of building a survival shelter out of sticks, from selecting the right location to adding insulation and protection. Let’s jump right in.
Step 1: Selecting the Right Location
When it comes to building a survival shelter with sticks, selecting the right location is crucial. A well-chosen location can provide you with the protection and resources you need to survive, while a poorly chosen location can make your survival situation even more challenging.
The first step in selecting a location for your survival shelter is to assess your surroundings. Look for a spot that is flat and free of hazards, such as sharp rocks, unstable ground, or dangerous wildlife. If possible, try to find a location that is elevated and away from water sources to avoid potential flooding.
Once you’ve found a suitable area, consider the following factors when choosing the specific spot for your shelter:
A. Proximity to Water
Water is essential for survival, so it’s important to choose a location that is close to a water source. However, be sure to avoid building your shelter directly on the water’s edge, as this can leave you vulnerable to flooding and other hazards.
B. Protection from Wind
Wind can quickly drain your body heat and make you feel colder than the actual temperature. Look for a location that provides natural wind protection, such as a grove of trees or a rock formation.
C. Exposure to Sunlight
While shade can be helpful in hot weather, it’s also important to get enough sunlight to keep you warm and dry. Look for a location that receives sunlight throughout the day.
D. Accessibility
When selecting a location, consider how accessible it will be for you to move around and collect resources. You don’t want to choose a location that’s too far away from essential resources or is difficult to access.
Once you’ve found a suitable location for your shelter, you can begin gathering the necessary materials to construct your shelter. In the next section, we’ll discuss how to gather materials and select the best sticks for building your shelter.
Step 2: Gathering Materials
Once you’ve selected the right location for your shelter, the next step is to gather the necessary materials. When it comes to building a survival shelter out of sticks, there are a few key materials that you’ll need:
1. Sticks
Of course, the main material you’ll need for your shelter is sticks. Look for straight and sturdy sticks that are at least as long as your height. Avoid using rotten or weak sticks, as they won’t provide the support and protection you need.
2. Leaves and Other Natural Materials
Once you’ve gathered your sticks, you’ll also need leaves or other natural materials to provide insulation and protection from the elements. Look for materials that are dry and fluffy, such as pine needles or dry grass.
3. Cordage
While not strictly necessary, having some cordage can make building your shelter much easier. You can use cordage to tie your sticks together or to lash them to a support structure. Look for natural cordage, such as vines or twine made from natural fibers.
4. Tools

Depending on the location and materials available, you may need some tools to help you gather and prepare your materials. A knife or small saw can be useful for cutting sticks to size, while a digging tool can help you clear the ground for your shelter.
When gathering your materials, be mindful of your impact on the environment. Avoid damaging living plants or disturbing wildlife, and only take what you need. If possible, try to gather materials from areas that have already been disturbed or where dead branches and leaves are plentiful.
Once you’ve gathered your materials, it’s time to start building your shelter. In the next section, we’ll discuss how to select the best sticks for constructing your shelter and how to start building the basic frame.
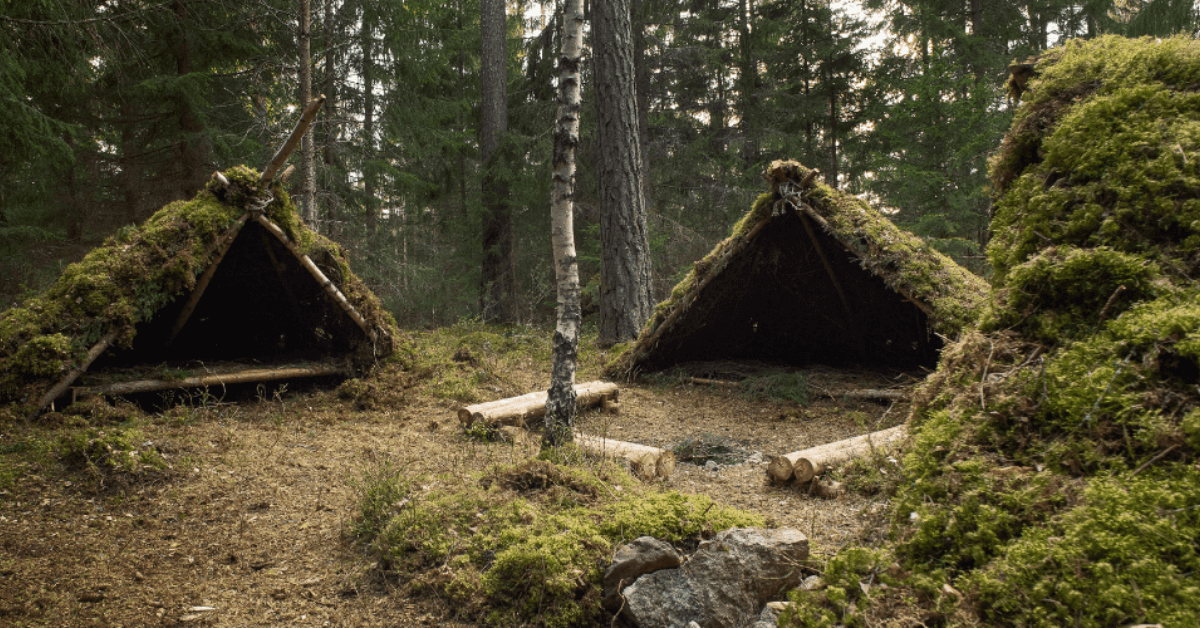
Step 3: Building the Frame
Now that you’ve gathered your materials, it’s time to start building the frame of your survival shelter. The frame is the basic structure of your shelter and will provide the support for the rest of the materials you’ll add.
To build the frame, follow these steps:
- Find two sturdy sticks that are at least as long as your height. These will be the main support beams for your shelter.
- Lean the support beams against a nearby tree or structure, such as a large rock. The two sticks should form an upside-down “V” shape, with the bottoms of the sticks about shoulder-width apart.
- Use cordage or natural fibers to tie the top of the two support beams together. This will keep the structure stable and prevent it from collapsing.
- Use additional sticks to create a horizontal support beam that connects the two main support beams. Tie the horizontal beam to the main support beams using cordage or natural fibers.
- Continue adding horizontal support beams to create the basic frame for your shelter. Be sure to space the beams evenly and tie them securely to the main support beams.
- Once you’ve finished the basic frame, add additional sticks and branches to create a roof and walls for your shelter. Use natural materials like leaves and grass to create insulation and protection from the elements.
As you build your shelter, be sure to test its stability and make any necessary adjustments. You want your shelter to be sturdy and secure, so that it can protect you from the elements and provide a safe place to rest.
With the frame of your shelter complete, you can now start adding more materials to create a cozy and comfortable space.
Step 4: Adding Insulation and Protection
Now that you’ve built the frame for your survival shelter, it’s time to add insulation and protection from the elements. The materials you’ll need for this step include leaves, grass, pine needles, or other natural materials that can provide insulation and warmth.
Here are the steps to follow:
- Starting at the bottom of your shelter, add a layer of leaves or grass to create a barrier between you and the ground. This will help insulate your body from the cold ground and keep you warmer.
- Next, add a layer of leaves or other natural materials to the roof of your shelter. Be sure to pack the materials tightly to prevent rain or snow from seeping through the gaps.
- If you have enough materials, you can also add a layer of insulation to the walls of your shelter. This will help keep the warmth inside your shelter and protect you from wind and rain.
- Finally, create a doorway or entrance to your shelter using sticks or branches. You can use additional materials like leaves or grass to create a barrier at the entrance to keep out wind and rain.
As you add insulation and protection to your shelter, be sure to test it out by spending some time inside. Make any necessary adjustments to ensure that your shelter is warm, dry, and comfortable.
Remember, the key to building a successful survival shelter is to be resourceful and creative with the materials you have on hand. With a little bit of ingenuity and some basic building skills, you can create a safe and comfortable space to weather the elements and stay alive in a survival situation.
Step 5: Finishing Touches
Now that you’ve built your survival shelter and added insulation and protection from the elements, it’s time to add some finishing touches to make your shelter as comfortable and livable as possible.
Here are some tips for adding those final details:
1. Create a bed
If you have enough materials, you can create a bed inside your shelter using branches or other sturdy materials. Add a layer of soft materials like leaves or grass on top to make it more comfortable.
2. Add a fire pit
If you’re able to start a fire, add a small fire pit inside your shelter to help keep you warm and provide light. Just be sure to keep the fire small and well-contained to prevent any accidents.
3. Organize your space
Use branches or other materials to create designated areas for your gear and supplies inside your shelter. This will help keep your space tidy and make it easier to find what you need.
4. Seal any gaps
After spending some time inside your shelter, you may notice gaps or holes where wind or rain can seep through. Use additional materials like leaves or grass to seal any gaps and keep your shelter as weatherproof as possible.
Remember, the finishing touches on your survival shelter will depend on the resources you have available and your personal preferences. The goal is to create a space that is as comfortable and livable as possible given the circumstances.
With these tips and some creativity, you can build a survival shelter that will keep you safe and comfortable in even the harshest of conditions.