Whether you’re a seasoned RV pro or a newbie camper, one thing you don’t want to mess around with is a wobbly camper. There’s nothing more annoying than trying to enjoy a peaceful night’s sleep or a relaxing evening inside your camper, only to be constantly reminded that your home on wheels has the stability of a Jenga tower.
That’s where stabilizing your camper comes in. Not only does it make for a more comfortable camping experience, but it can also prolong the life of your camper by preventing excessive wear and tear on its structural components.
Below, we’ll explore 10 options for permanently stabilizing your camper, so you can finally say goodbye to that shaky feeling once and for all.
1. Install a Stabilizer Jack
If you’re looking for a reliable and easy-to-install option for stabilizing your camper, a stabilizer jack might be just what you need. These jacks can be installed on the corners of your camper and are designed to take the weight off your suspension system, reducing movement and wobbling.
When selecting a stabilizer jack, it’s important to choose one that is rated for the weight of your camper. Most jacks come with weight ratings, so be sure to check the specifications before making a purchase. You’ll also want to consider the material of the jack, as some are made from steel, aluminum, or other lightweight materials.
To install a stabilizer jack, you’ll first need to find the right location on your camper. This is typically the area where your suspension system connects to your frame. Once you’ve found the spot, you can mount the jack using bolts or welds, depending on the design of the jack.
Onto the benefits.
One benefit of installing stabilizer jacks is that they can be easily adjusted to accommodate uneven terrain. Simply adjust the height of the jack to level out your camper, and you’ll have a stable living space in no time. Additionally, some stabilizer jacks come with built-in leveling systems, making the setup process even easier.
2. Invest in a Set of Wheel Chocks
Wheel chocks are another effective way to stabilize your camper and prevent unwanted movement. These small blocks are placed behind your camper’s wheels and prevent them from rolling or shifting, which can help reduce wobbling and swaying.
When selecting a set of wheel chocks, it’s important to choose ones that are designed for the weight and size of your camper. Look for chocks made from heavy-duty materials, like rubber or high-density plastic, as these will provide the most stability and durability.
To use wheel chocks, simply place them snugly behind your camper’s wheels, making sure they’re firmly in place. If you’re parked on an incline, be sure to place chocks on both the uphill and downhill sides to prevent any potential rolling or shifting.
One benefit of using wheel chocks is that they are compact and lightweight, making them easy to store and transport. They can also be used in conjunction with other stabilizing options, like stabilizer jacks or leveling blocks, for added stability and security.
However, it’s important to note that wheel chocks alone may not be enough to fully stabilize your camper, especially in windy or extreme weather conditions. It’s important to supplement them with other stabilizing options for added stability and security.
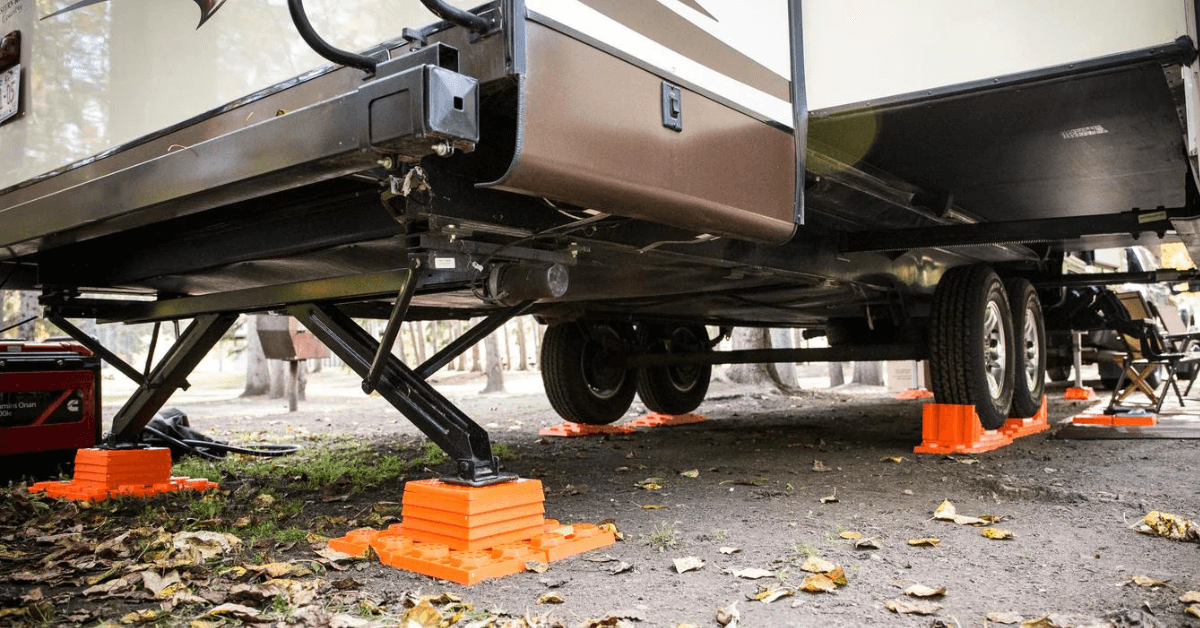
3. Install Stabilizing Jack Pads
If you’re using stabilizer jacks to stabilize your camper, you may want to consider installing stabilizing jack pads as well. These pads are placed under your jacks and help distribute weight more evenly, which can reduce wobbling and improve stability.
Stabilizing jack pads are typically made from heavy-duty materials, like rubber or high-density plastic, and come in a variety of shapes and sizes to accommodate different types of jacks. They can be placed on a variety of surfaces, including asphalt, concrete, or dirt.
To install stabilizing jack pads, simply place them underneath your jacks before extending them. Make sure they are positioned correctly and are level before use. This will help prevent any unwanted movement or shifting while you’re parked.
One benefit of using stabilizing jack pads is that they can help extend the life of your jacks by reducing wear and tear on the jack foot. They also provide an extra layer of protection against sinking into soft or wet ground, which can compromise stability.
However, it’s important to note that stabilizing jack pads may not be necessary for all camping situations. If you’re parked on a solid, level surface, or using a weight distribution hitch, stabilizing jack pads may not be needed.
4. Install a Sway Bar
Another option for permanently stabilizing your camper is to install a sway bar. Sway bars, also known as anti-sway bars or weight distribution bars, are designed to reduce sway or bouncing when towing your camper.
Sway bars work by connecting the trailer’s frame to the tow vehicle’s frame, using tension to distribute the weight of the trailer evenly. This helps prevent the trailer from swaying or bouncing, which can be especially useful in windy or uneven terrain.
To install a sway bar, you’ll need to purchase a weight distribution system that includes the bar, brackets, and hardware. The system should be compatible with your tow vehicle and camper’s weight and size.
Installation of the sway bar can be done at home with basic tools and some mechanical know-how, or you can have it installed by a professional. The process typically involves attaching the brackets to your trailer’s frame and hitch, then installing the sway bar onto the brackets and adjusting the tension as needed.
One advantage of installing a sway bar is that it can help improve handling and control while towing, which can improve safety on the road. It can also reduce wear and tear on your tow vehicle and camper’s suspension system, which can save you money in the long run.
However, it’s important to note that sway bars may not be necessary for all camping situations. If you’re towing a small camper on a short trip, or if you’re camping in a relatively flat and stable area, a sway bar may not be needed.
Related: How To Level A Motorhome With Blocks: Expert Advice
5. Use a Leveling Block
Another popular option for stabilizing your camper is to use a leveling block. These blocks are typically made from heavy-duty plastic or wood and are placed underneath your camper’s wheels to level out your rig on uneven terrain.
To use a leveling block, simply place the block in front of or behind the wheel that needs to be raised, and slowly drive onto it. Repeat the process until your camper is level. Some leveling blocks even come with built-in bubble levels to make the process even easier.
One benefit of using leveling blocks is that they are portable and can be easily stored in your camper or tow vehicle. They’re also relatively inexpensive compared to other stabilizing options, making them a great choice for those on a budget.
However, it’s important to note that leveling blocks may not be the best option for permanent stabilization, as they can shift or move if not placed correctly. They may also sink into soft or wet ground, causing your camper to become unstable.
If you’re looking for a more long-term solution, you may want to consider combining leveling blocks with other stabilizing options, like a stabilizer jack or weight distribution hitch. This will help ensure that your camper stays stable and secure, no matter the terrain or weather conditions.
6. Install a Weight Distribution Hitch
Another option for permanently stabilizing your camper is to install a weight distribution hitch. This type of hitch is designed to distribute the weight of your camper evenly across your tow vehicle and trailer axles, which can help reduce bouncing and swaying while towing.
A weight distribution hitch typically includes a hitch head, spring bars, and mounting hardware. To install it, you’ll need to attach the hitch head to your tow vehicle’s hitch receiver and adjust the height to match the height of your trailer’s coupler. Then, you’ll need to install the spring bars onto the hitch head and attach them to your trailer’s frame.
The key to getting the right weight distribution hitch for your camper is to make sure it’s rated for the weight of your camper and tow vehicle. You can find this information in your owner’s manual or by consulting a professional.
One advantage of installing a weight distribution hitch is that it can help improve stability and control while towing, which can improve safety on the road. It can also reduce wear and tear on your tow vehicle and camper’s suspension system, which can save you money in the long run.
That said, it’s important to note that weight distribution hitches may not be necessary for all camping situations. If you’re towing a small camper on a short trip, or if you’re camping in a relatively flat and stable area, a weight distribution hitch may not be needed.
7. Use a Scissor Jack
Scissor jacks are another popular option for stabilizing your camper. They are small, lightweight, and easy to store in your camper or tow vehicle.
To use a scissor jack, start by locating the four corners of your camper. You’ll need to place the jack underneath the frame of each corner, close to the tire. Once the jack is in place, use a hand crank to raise the jack until it is supporting the weight of the camper.
It’s important to note that scissor jacks are designed for stabilization, not lifting. You should only use them to stabilize your camper once it is level, and never to lift your camper off the ground.
One advantage of using scissor jacks is that they are relatively inexpensive and easy to use. They can also be adjusted to the height you need, which makes them a versatile option for a variety of camping situations.
Unfortunately, scissor jacks may not be the best option for all types of terrain. They are designed for use on relatively flat surfaces, and may not be as effective on uneven or sloped terrain. In those situations, you may need to use additional stabilizing methods, such as wheel chocks or leveling blocks.
8. Install Tripod Stabilizers
If you’re looking for a more heavy-duty stabilizing option, tripod stabilizers may be the way to go. These are large, sturdy devices that are designed to provide maximum stability and support for your camper.
To install tripod stabilizers, you’ll need to find a solid and level spot in the ground where you can position the stabilizer. Then, extend the legs of the tripod until they make contact with the ground, making sure that each leg is firmly planted.
Next, attach the top of the tripod to the hitch of your camper. You may need to use additional straps or chains to secure the stabilizer to the camper, depending on the specific model you’re using.
One advantage of tripod stabilizers is that they provide excellent stability and support, even on uneven or sloped terrain. They can also be adjusted to the height you need, which makes them a versatile option for a variety of camping situations.
On the other hand, tripod stabilizers can be bulky and heavy, which may make them difficult to store and transport. They can also be more expensive than other stabilizing options, which may be a consideration for some campers.
9. Use Stabilizing Blocks
Stabilizing blocks are a popular option for campers who are looking for an affordable and easy-to-use way to stabilize their camper. These blocks are typically made of heavy-duty plastic or rubber and can be stacked to the desired height, depending on the level of stability you need.
To use stabilizing blocks, first, find a solid and level spot to park your camper. Then, place the blocks in a stack, with the bottom block resting on the ground and the top block supporting the weight of the camper.
To ensure that the blocks stay in place, you may want to use chocks or other stabilizing devices to prevent them from shifting or moving.
One advantage of stabilizing blocks is that they are lightweight and easy to store, making them a convenient option for campers who are on the move. They are also relatively inexpensive, which makes them an affordable option for those who are looking to stabilize their camper on a budget.
Now, one potential drawback of stabilizing blocks is that they may not be as sturdy or supportive as other stabilizing options, such as stabilizer jacks or tripod stabilizers. They may also be less effective on uneven or sloped terrain, as they rely on a flat and level surface to provide stability.
10. Install Suspension Upgrades
The suspension system of your tow vehicle plays a vital role in stabilizing your camper. A weak suspension can cause your vehicle and camper to sway and bounce, making it challenging to control the movement of your camper. Installing suspension upgrades, such as heavy-duty shock absorbers, air springs, or upgraded leaf springs, can help to stabilize your vehicle and provide a smoother, more controlled ride.
By improving your vehicle’s suspension, you’ll also reduce the amount of stress placed on your camper’s frame and components. The improved suspension will better absorb road imperfections and distribute weight evenly, resulting in less strain on your camper’s structure.
Now, when installing suspension upgrades, it’s essential to choose upgrades that are appropriate for your vehicle’s towing capacity and the weight of your camper. It’s also crucial to have the upgrades installed by a professional to ensure proper installation and optimal performance.